
Customize EDI guidelines Last updated: 2026-10-01
What is an EDI template?
ediFabric .NET defines an EDI template as:
- A regular C# .NET class that represents the shape of an EDI transaction.
- Is annotated with our EDI Template Format attributes.
So an EDI Template is a normal C# class with some extra markup. EDI transactions are usually accompanied by their implementation guides, either the official ones (from UN/EDIFACT or ASC X12) or the respective trading partners' specific ones. The guides are meant for humans and are in text or PDF formats and can't be transferred automatically from machine to machine.
This article explains the layout of EDI Template Format, used to exchange EDI implementation guidelines in a machine-readable form. EDI translators, such as ediFabric .NET, which can directly import EDI templates can save users considerable time in developing new translations or maps.
EDI template example
- An excerpt from EDI Transaction Guide for X12 270 looks like this:
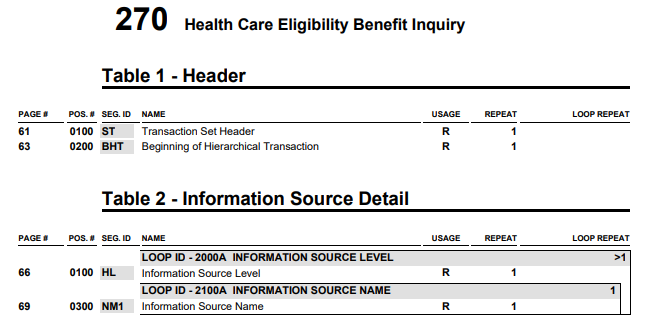
- The corresponding EDI Template for X12 270, would like like this:
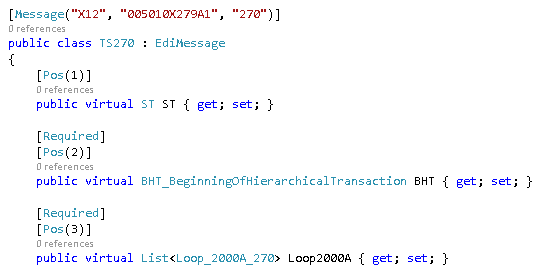
ediFabric .NET and EDI templates
The purpose of an EDI Template is to represent the implementation guide of an EDI transaction in such a way that:
- Is machine-friendly
- Is .NET developer-friendly
- It can easily be created or modified
- It can easily be transferred, shared, and documented
- Is completely free
- It does not require extra learning or tooling
When ediFabric .NET parses an EDI file, it produces .NET objects which are instances of the corresponding EDI templates (.NET classes). Similarly, when ediFabric .NET creates EDI files, it writes the data from .NET objects which are instances of EDI templates (.NET classes). We can safely say that all available operations in ediFabric .NET work on either EDI files or .NET objects.
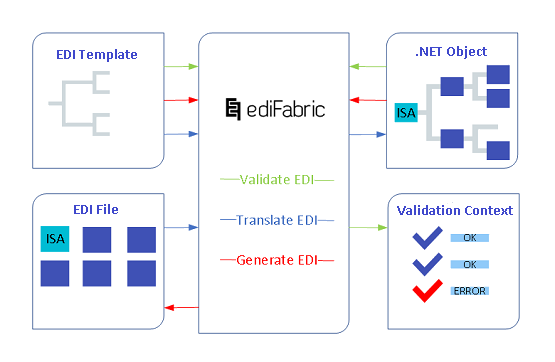
EDI and .NET equivalent terms
| .NET | ediFabric .NET | EDI |
|---|---|---|
| C# Class | EDI Template | EDI Guideline |
| Class instance (POCO) | .NET object | EDI transaction (EDI document) |
EDI template format specification
The EDI templates define a standard way for accessing and manipulating EDI transactions. All that is required to turn an EDI guide to an EDI template is the .NET Framework (or .NET Core) and the EdiFabric NuGet package.
EDI Transactions
[Message("X12", "002040", "810")]
 public class TS810 : EdiMessage
EDI transaction sets are represented as regular C# classes, annotated with the MessageAttribute and inheriting from EdiMessage. The first parameter in the MessageAttribute is the EDI standard (X12, EDIFACT, HL7, etc.). The second parameter is the EDI version (edition + release). The last parameter is the EDI transaction set identifier.
ediFabric .NET uses internally these attribute values to locate and load the correct transaction set class whilst parsing an EDI file. All EDI transactions in the file will be matched to a template by the three values - EDI standard, EDI version, and EDI transaction set. Classes with the same values for all three attributes are not allowed in the same assembly and are regarded as duplicates.
Position numbers
[Pos(1)]
 public ST ST { get; set; }
 [Pos(2)]
 public BIG BIG { get; set; }
 [Pos(3)]
 public List<NTE> NTE { get; set; }
EDI position numbers are marked with the PosAttribute. All EDI loops, segments and data elements are positional and the order in which they can appear is driven by the specification. Classes can contain only ordered public properties in the exact sequence as prescribed by the guidelines for every EDI transaction.
Note
It is possible to have multiple items at the same position, or a choice of items, only one of which is allowed at certain position. For this use AllAttribute and OneOfAttribute.
Repeat count
public List<NTE> NTE { get; set; }EDI repeat count is represented as generic C# List<>. EDI loops, segments and data elements can repeat according to the guideline. Whenever the parser encounters a property that is defined as a List<> it will automatically treat it as a repeating EDI item.
EDI loops
[Group(typeof(N1))]
 public class TS810_N1Loop1
EDI loops (or EDI groups) are marked with the GroupAttribute. The only parameter is the type of the first (trigger) segment in the group. Every group must contain at least a mandatory non-repeating segment in the first position.
EDI segments
[Segment("BHT", typeof(X12_ID_1005), typeof(X12_ID_353))]
 public class BHT
EDI segments are marked with the SegmentAttribute. The first parameter is the EDI identifier of the segment. The second parameter is a reference to the class defining the EDI code set for the first data element in the segment. If the first data element is not a code set then this is null. The last parameter is a reference to the class defining the EDI code set for the second data element in the segment. If the second data element is not a code set then this is null.
Note
For X12 HL segments the last parameter is a reference to the class defining the EDI code set for the third data element in the segment.
The code sets are used by the EDI parser when searching for matching segments from the inbound EDI document to the EDI class.
Logical groups at the same position
[All()]
 public class All_NM1
EDI items that can either appear in any order, or at the same position, are marked with the AllAttribute. These logical groups are simply containers for segments and have no trigger segment. The position of the logical group is the same as the position of all its items.
Note
The AllAttribute can only be applied to loops or segments, and only if the grouping is uniform, e.g. to group either loops or segment, but not loops and segments.
Groups without trigger segment
[SeqOf()]
 public class All_1_TSADRA19
EDI groups of segments without a trigger segment are marked with the SeqOfAttribute. These groups are containers for segments and have no trigger segment. The group is identified by the unique tags of the segments it contains.
Note
The SeqOfAttribute can only be applied for the NCPDP Telecommunications standard.
Choice of items at the same position
[OneOf()]
 public class All_1_TSEHCE01
A choice of EDI items, only one of which is allowed at a certain position, is marked with the OneOfAttribute. These groups are containers for segments that can appear at the same position.
Note
The OneOfAttribute is usualy applied to items in the HL7 standard.
EDI composite data elements
[Composite("C108")]
 public class C108
EDI composite data elements are marked with the CompositeAttribute. The first parameter is the EDI identifier of the composite element.
EDI data elements
public string TransactionTypeCode_07 { get; set; }EDI simple data elements and EDI component data elements are represented as C# strings. Data elements can repeat in segments and in composite data elements.
EDI Code Sets
[EdiCodes(",00,18,")]
 public class X12_ID_353
EDI code sets are represented as classes marked with the EdiCodesAttribute. The only parameter is a string containing all of the allowed EDI codes, delimited with a comma.
Convert an EDI guide to an EDI template
There are always two levels of details that every EDI implementation guideline provides - the hierarchical transaction/loop level, and then the definition of each segment.
-
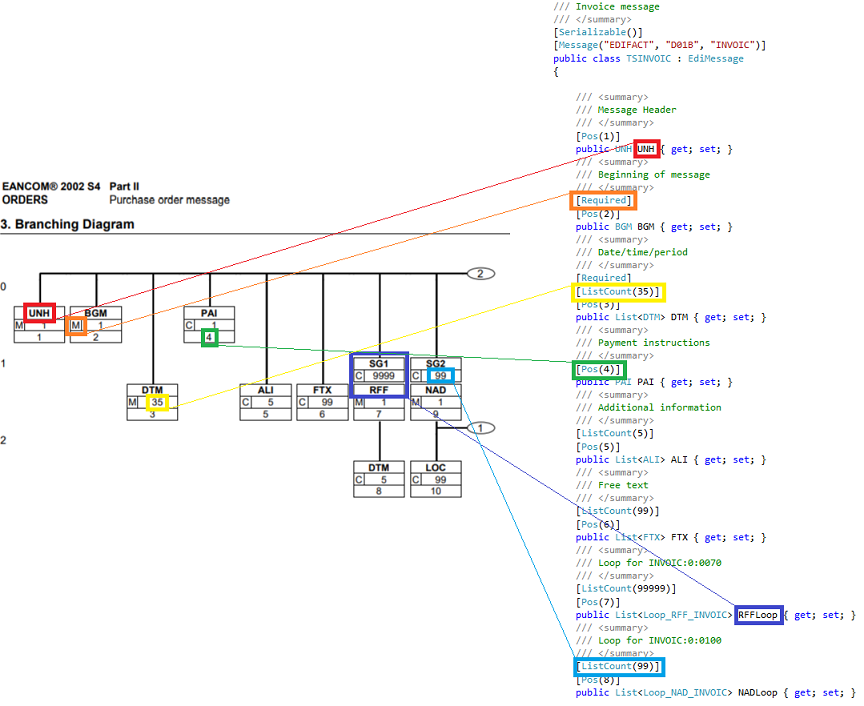
EDI transaction and loops
- Correct position of the segment\loop, represented by the PosAttribute
- Segment names, represented by the class name
- Loop names, represented by the name of the first segment in the loop
- Correct usage, represented by the RequiredAttribure if mandatory and no attribute if optional
- Correct number of repetitions, represented by the ListCountAttribute
-
EDI segments
- Correct position of complex and simple data elements, represented by the PosAttribute
- Complex data element names, represented by the class name
- Correct usage, represented by the RequiredAttribure if mandatory and no attribute if optional
- Correct number of repetitions, represented by the ListCountAttribute
- Correct data element code, represented by the DataElementAttribute, first argument
- Correct data element type, represented by the DataElementAttribute, second argument
- Correct values for EDI codes, represented by EdiCodesAttribute
- Correct data element length, represented by the StringLenghtAttribute
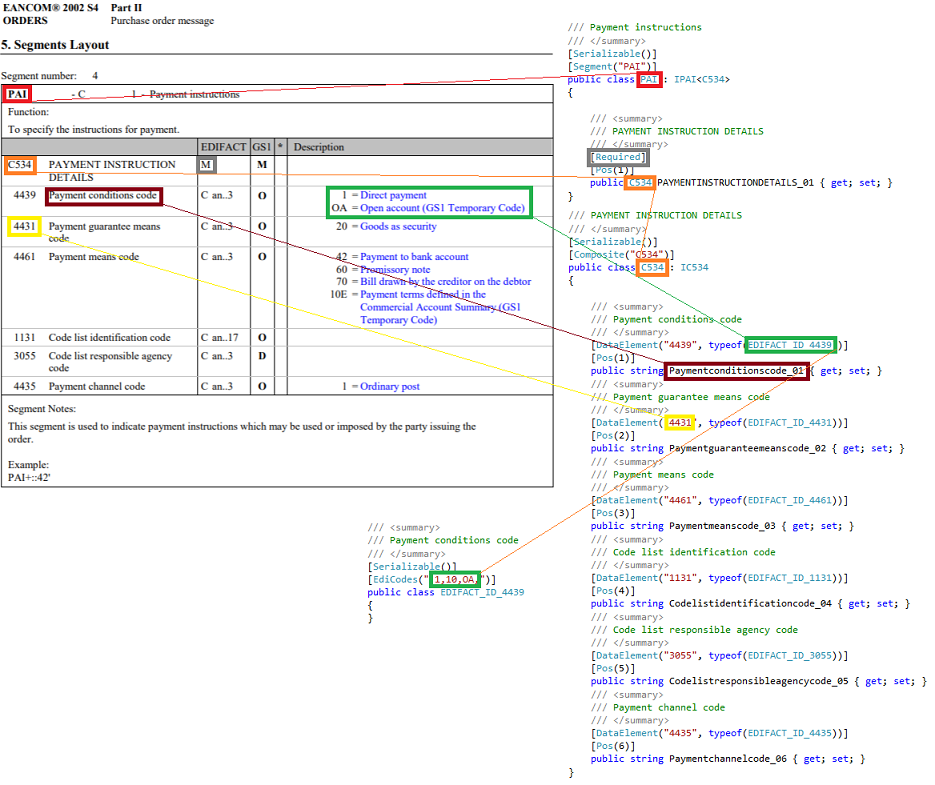
How to install EDI templates
The template format above is what you install into your own projects. This section shows how to install EDI templates as C# files.
Note
This section applies to paid plans. On the community plan, follow Community: install the NuGet templates.
-
Create a new library project for your target .NET version:


-
Install the purchased EdiFabric package and add references to System.Runtime.Serialization and System.Xml.Serialization (.NET Framework only):
-
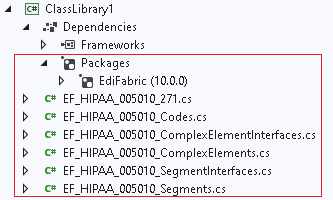
Add your EDI template(s) to the project as "Existing Item"; only the one(s) you need, for example, HIPAA 5010 271. Add all common files, such as Segments.cs, Codes.cs, ComplexElements.cs,SegmentInterfaces.cs and ComplexElementInterfaces.cs to the project as "Existing Item":
-
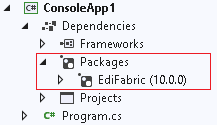
In your startup application, Install the purchased EdiFabric package.
Add a project reference to the class library project you created in step 1:
-
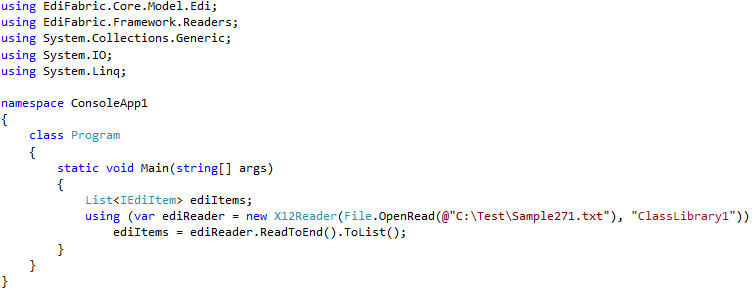
Use EdiReader (either X12Reader or EdifactReader) to translate your sample EDI file
How to modify EDI templates
All EDI templates are provided in their purest form, as a collection of C# classes and files, which developers can then use to combine, build and integrate into their own solutions.
Note
On the community plan and in the examples, most EDI templates come as pre-built assemblies (NuGet packages), apart from the example templates. Paid plans provide all of them as C# files.
Why modify an EDI template
Sometimes you need to modify your existing EDI template(s) for reasons such as:
- To match an external specification
- A trading partner uses custom EDI code sets
- A trading partner uses extra fields in one or more segments
- A trading partner requires optional data elements to be mandatory, or vice versa
- A trading partner uses segments and loops in different positions
- A developer wants to add extra properties to the EDI template, not relevant to EDI
It is perfectly fine to go ahead and do any of these changes. EDI templates are meant to be living documents that can easily be modified when the guidelines change.
Note
The rule of thumb is to maintain the baseline version of the template in one project and to move all partner-specific customization into separate projects. This way the baseline version is shielded from any changes and all new modifications are safely isolated into their own containers.
There are two ways to modify a template:
- By deriving from the C# class of the template, and then modify the derived class
- By creating a copy of the template, and then modify the copy
Modify by deriving from a C# class
Let's assume that a trading partner (Partner A) wants to send you custom purchase orders, based on a standard EDI version, like X12 4010. The concepts in this example are valid for all EDI standards.
The full example is available in GitHub:
Let's also assume that all the differences are in the BEG segment only and are specified as:
- The data element at position 4 is changed from Optional to Mandatory
- The data element at position 12 is subject to a new code set with only two values - NEWCODE1 and NEWCODE2
- An extra data element of type alphanumeric is added just after the last data element at position 12
This is how the standard EDI template for X12 4010 850 (purchase order) looks like. The specification of the BEG segment is (omitting the elements that don't change):
[Segment("BEG")]
public class BEG
{
    ... other elements

    [StringLength(1, 30)]
    [DataElement("328", typeof(X12_AN))]
    [Pos(4)]
    public string ReleaseNumber_04 { get; set; }

    ... other elements

    [DataElement("640", typeof(X12_ID_640))]
    [Pos(12)]
    public string TransactionTypeCode_12 { get; set; }
}
The exact definition of the BEG segment is here (search for BEG).
The code set for the data element at position 12 is defined as:
[EdiCodes(@",01,02,03,04,05,06,07,08,09,10,11,13,14,15,16,17,18,19,20,21,22,23,24,25,26,27,28,29,30,33,34,35,36,37,38,39,3M,40,41,60,62,63,64,65,66,67,68,69,6A,6C,6N,6R,6S,70,71,72,73,74,75,76,77,78,79,80,81,82,83,85,87,88,91,94,95,97,98,99,A0,A1,A3,A4,A5,A6,A7,AA,AB,AC,AD,AE,AF,AG,AI,AM,AN,AP,AQ,AR,AS,AT,AV,AW,AZ,BA,BB,BD,BF,BH,BJ,BK,BL,BM,BN,BO,BP,BR,BS,BT,BU,BV,BW,C0,C1,C2,C3,CA,CB,CC,CD,CE,CF,CG,CH,CI,CJ,CK,CL,CM,CN,CO,CP,CR,CS,CT,CU,CV,CW,CX,CY,CZ,D1,D4,DA,DB,DC,DD,DE,DF,DG,DH,DI,DK,DL,DN,DO,DP,DQ,DR,DS,DT,DU,EA,EB,EF,EI,EM,EP,ER,EX,FA,FB,FC,FD,FE,FF,FG,FI,FL,FM,FN,FP,FR,FS,FT,GA,GI,GR,HP,I1,IA,IB,IC,ID,IE,IF,II,IM,IN,IO,IR,IU,IW,IX,IZ,JM,JO,JR,JS,JU,JX,KB,KC,KD,KE,KF,KG,KH,KI,KJ,KK,KL,KM,KN,KS,KT,LC,LD,LE,LF,LN,LO,LP,LR,LV,M1,MA,MB,MC,MD,ME,MF,MI,ML,MM,MP,MR,MS,MU,N1,N2,N3,N4,N5,N6,N7,N8,NA,NB,NC,ND,NE,NF,NG,NH,NI,NJ,NK,NL,NM,NO,NP,NQ,NR,NT,NU,OC,OF,OP,OR,P1,PA,PB,PC,PD,PE,PF,PG,PI,PL,PM,PO,PP,PR,PS,PT,PU,PV,PW,PX,PZ,QA,QB,QC,QD,QE,QF,QG,QH,QJ,QK,QL,QP,QR,R1,R2,R3,R4,R5,R6,R7,R8,RA,RB,RC,RD,RE,RF,RG,RH,RK,RM,RP,RQ,RS,RT,RU,RZ,S1,S2,S3,S4,SA,SB,SC,SD,SE,SF,SG,SH,SL,SM,SO,SP,SQ,SR,SS,ST,SU,SV,TD,TG,TH,TI,TJ,TK,TP,TR,TS,TT,TX,U1,U2,U4,U5,U9,UA,UC,UD,UF,UI,UM,UO,UP,UR,UT,V1,VH,VJ,VL,VM,VN,VO,VP,VQ,VR,W1,W4,W5,WA,WC,WD,WH,WO,WS,WT,X1,XA,XB,XC,XD,XX,XY,XZ,YI,YR,ZA,ZB,ZC,ZD,ZE,ZF,ZG,ZH,ZI,ZJ,ZK,ZL,ZM,ZN,ZO,ZP,ZQ,ZR,ZS,ZT,ZU,ZW,ZZ,")]
public class X12_ID_640
{
}
The following steps can be taken to create a new EDI template that matches the differences in the BEG segment listed above:
- Create a new C# class that derives from the BEG segment class.
- Add the [Required] attribute to the ReleaseNumber_04 element, to mark it as mandatory.
- Create a new class, X12_ID_640_Modified, for the EDI codes and add it as the type for TransactionTypeCode_12 element in [DataElement] attribute. Add NEWCODE1 and NEWCODE2 as the only code values in the new class.
- Create a new element, ExtraElement_13, and add the [Pos(13)] attribute to it, to mark it at the last position.
The final modified BEG segment should look like this (the changes to the original template are bolded):
[Segment("BEG")]
public class BEGModified : BEG
{
    [Required]
    [StringLength(1, 30)]
    [DataElement("328", typeof(X12_AN))]
    [Pos(4)]
    public new string ReleaseNumber_04 { get; set; }

    [DataElement("640", typeof(X12_ID_640_Modified))]
    [Pos(12)]
    public new string TransactionTypeCode_12 { get; set; }

    [DataElement("Extra", typeof(X12_AN))]
    [Pos(13)]
    public string ExtraElement_13 { get; set; }
}
The new code set class X12_ID_640_Modified is defined as:
[EdiCodes(@",NEWCODE1,NEWCODE2,")]
public class X12_ID_640_Modified
{
}
Note
All data elements in the derived class must hide the inherited members by using the new keyword.
The final step is to create a derived class for the purchase order template, and use the derived BEGModified class in it (the changes to the original template are bolded):
[Message("X12", "004010", "850")]
public class TS850Modified : TS850
{
    [Required]
    [Pos(2)]
    public new BEGModified BEG { get; set; }
}
That's it. The new template derives from the original and ideally is in a separate file, so when the original template changes (e.g., for a bug fix), the derived will remain unaffected.
Additional examples in GitHub:
How to use the modified template
To use any template, regardless of whether it is original or modified do:
- When generating an EDI file - instantiate the type you want to work with.
- When parsing an EDI file - pass in either the assembly or the type that you want.
A good practice is to split the original template and the derived template into separate projects and to also rename the namespace so that your calling application can have references to both projects at the same time. Then load either the original or the modified assembly, either by knowing where the file has come from:
var x12Templates = "MyOriginalTemplatesForX124010";
if(EDI file is from Partner A)
    x12Templates = "MyModifiedTemplatesForX124010";

using (var ediReader = new X12Reader(File.OpenRead("EDI file"), x12Templates))
or by using the sender/receiver values from the envelope
using (var ediReader = new X12Reader(ediStream, AssemblyFactory))

public static Assembly AssemblyFactory(MessageContext messageContext)
{
    if (messageContext.SenderId == "PARTNERA")
        return Assembly.Load("MyModifiedTemplatesForX124010");

    return Assembly.Load("MyOriginalTemplatesForX124010");
}
You can have both the original template AND the modified in the same project/assembly. In this case, use type factory instead of assembly, because assembly matching uses the MessageAttribute, which only works when a single type in the assembly has the same values for standard, version, and transaction ID.
using (var ediReader = new X12Reader(ediStream, TypeFactory))

public static TypeInfo TypeFactory(ISA isa, GS gs, ST st)
{
    if (isa.InterchangeSenderID_6 == "PARTNERA")
        return typeof(TS850Modified).GetTypeInfo();

    return typeof(TS850).GetTypeInfo();
}
Additional examples in GitHub:
Modify by creating a new copy
Back to the example above. This time, copy all the template files into a new project.
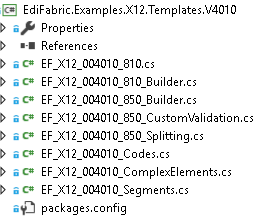
Keep the original X12 templates in one project.
Original project:
Note
A good design is to also move the segment and complex interface files into a separate project and add a reference to it.
Create a separate project, for the modified templates, let's call it Partner B. Then copy the following files into it:
- The message file for 850,
- The segments file
- The EDI codes file
- The complex elements file
- The interfaces files for segments and complex elements (given they are not in a separate project)
Modified project for Partner B
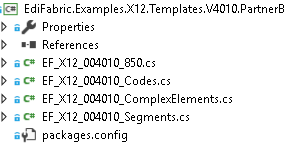
Ensure to add a reference to the interfaces project, if any.
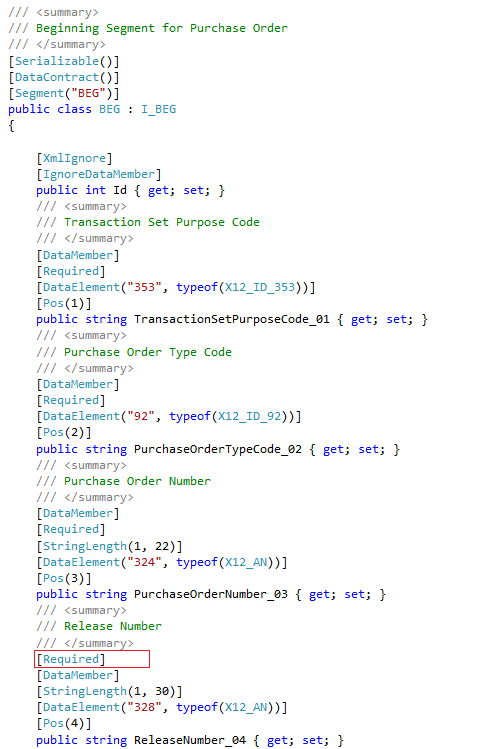
Apply any modifications directly in the BEG segment, in the modified project.
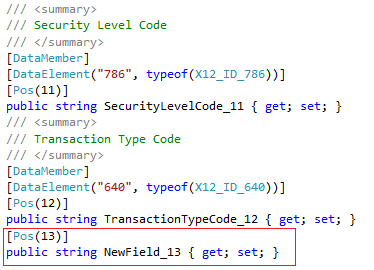
Note
Rename the namespace to be able to use both the original project and the modified project as references to the same calling application.
Use the modified template
Load the modified template in the modified project in exactly the same way as explained in the How to use the modified template paragraph above.
var x12Templates = "EdiFabric.Examples.X12.Templates.V4010";
if(EDI file is from Partner B)
    x12Templates = "EdiFabric.Examples.X12.Templates.V4010.PartnerB";

using (var ediReader = new X12Reader(File.OpenRead("EDI file"), x12Templates))
How to add non-EDI properties
Sometimes you need to add custom properties that are irrelevant to both the parser and EDI in general. This is handy when the template is used for EDI and for other purposes.
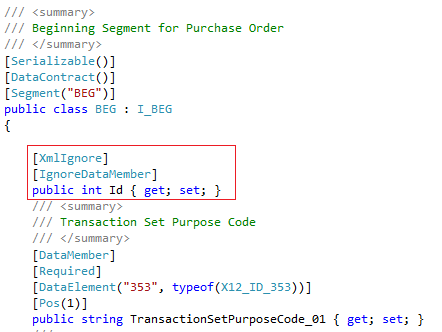
All you need to do is simply add the property. ediFabric .NET is only interested in the properties annotated with the template attributes and all properties that are not annotated with the template attributes will be discarded.
To add a new int member Id, simply insert it in the class definition, and do not annotate it with template attributes, not even the [Pos] attribute. Should you use JSON or XML serialization you will have to add all serialization properties too.
Rules for deriving from EDI template
All EDI templates support inheritance. This allows you to define custom templates that reuse, extend, or modify the structure of the original templates.
EDI template inheritance can be applied to any C# class by following these rules:
-
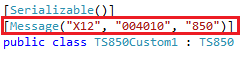
Derived classes must retain all template attributes. For example, if you want to inherit from
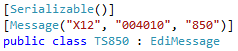
The new class must still define the original attributes:
-
Hidden or overridden properties must retain all template attributes. For example, if want to add an extra validation attribute to ReleaseNumber_04 property and make it mandatory
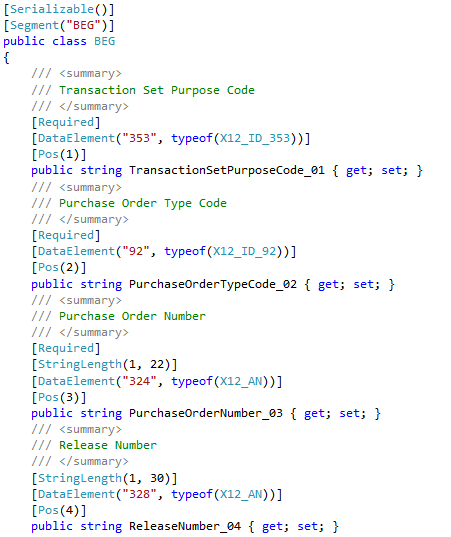
The new class must retain the original attributes:
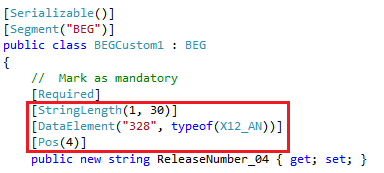
-
To not duplicate positions. The parser will throw an exception if there are any properties marked with [Pos] attribute for the same position.